ECE 5725 Final Project: RPi Autonomous Guitar Tuner
Cynthia Zelga (cnz5) & Sizhe Zhang (sz592)
December 13, 2019
Design & Testing
1. Recording audio and detecting frequency
We utilized the Python PyAudio library as well as an open-source algorithm we found online for taking in audio input, reducing noise, and computing the Fast Fourier Transform to identify frequency (please see References for a link). To use PyAudio, we first simply had to install it to our RPi by using the following command: “sudo apt-get install python-pyaudio”. For the frequency-detection algorithm, we searched through a few examples onlines but found that this one was most accurate. To input the audio signal, we initially thought we would need to build a microphone/amplifier circuit as well as utilize an analog-to-digital converter (ADC) to input the analog audio as a digital signal into the RPi. However, we realized we could simply use any microphone that could connect to the RPi by USB. We ultimately used a sound card to connect a microphone to the RPi. The sound card connected on one end to the RPi by USB, and on the other end had a headphone jack, to which we connected a pair of earbuds that included a microphone. This microphone was most convenient as we could hold the microphone very close to where the guitar strings are strummed, allowing us to acquire an audio input of sufficient amplitude.
To test that the frequency-detection was accurate, we utilized a frequency generator application on a smartphone to generate difference frequencies. We knew that the algorithm was working as it was correctly identifying the frequencies of the tones we selected. To ensure that the limit we chose for identifying a tone versus noise was appropriate, we would periodically play a tone, stop playing it, and play it again. Doing this allowed us to verify that the algorithm was only detecting frequencies when the tone was played, and was not detecting any frequencies once the sound stopped.
2. Implementing the user interface
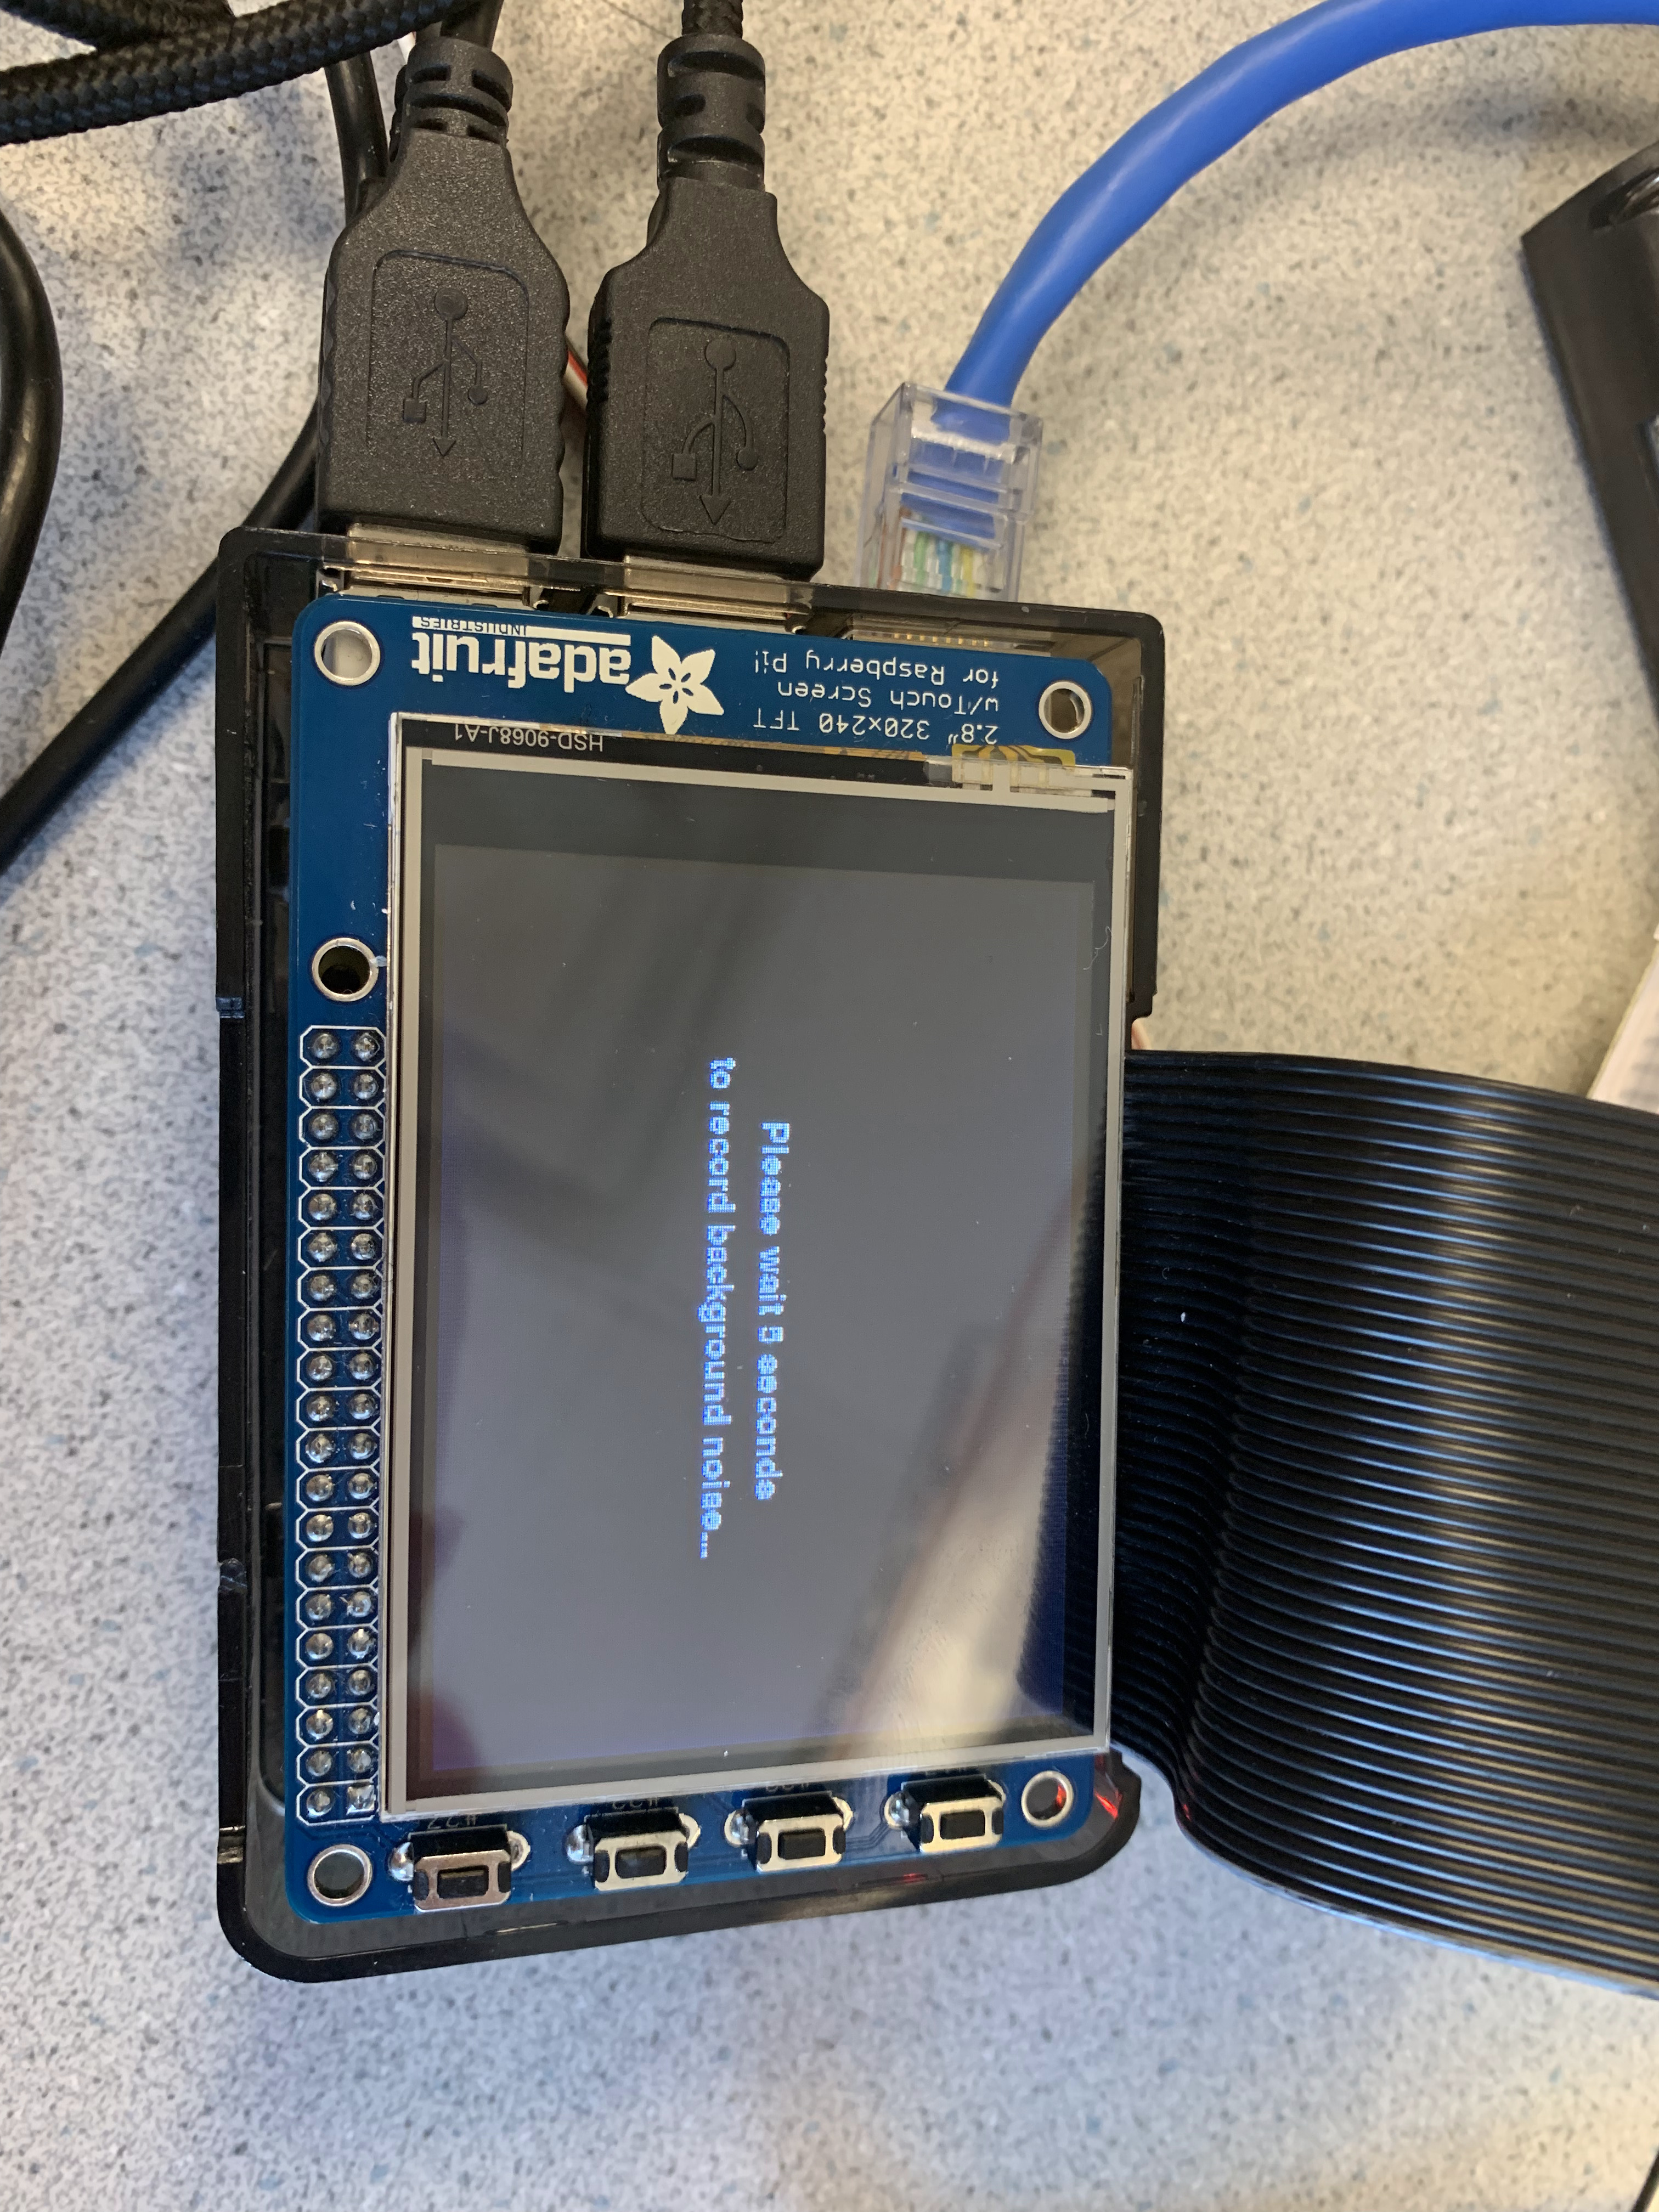
We displayed 3 different screens in our Python script. The first screen is a black screen with white text that reads “Please wait 5 seconds to record noise…”. The frequency detection algorithm listens to background noise for 5 seconds, computes its average, and later subtracts average noise from any detected sound to reduce background noise and isolate the input audio we want to detect.
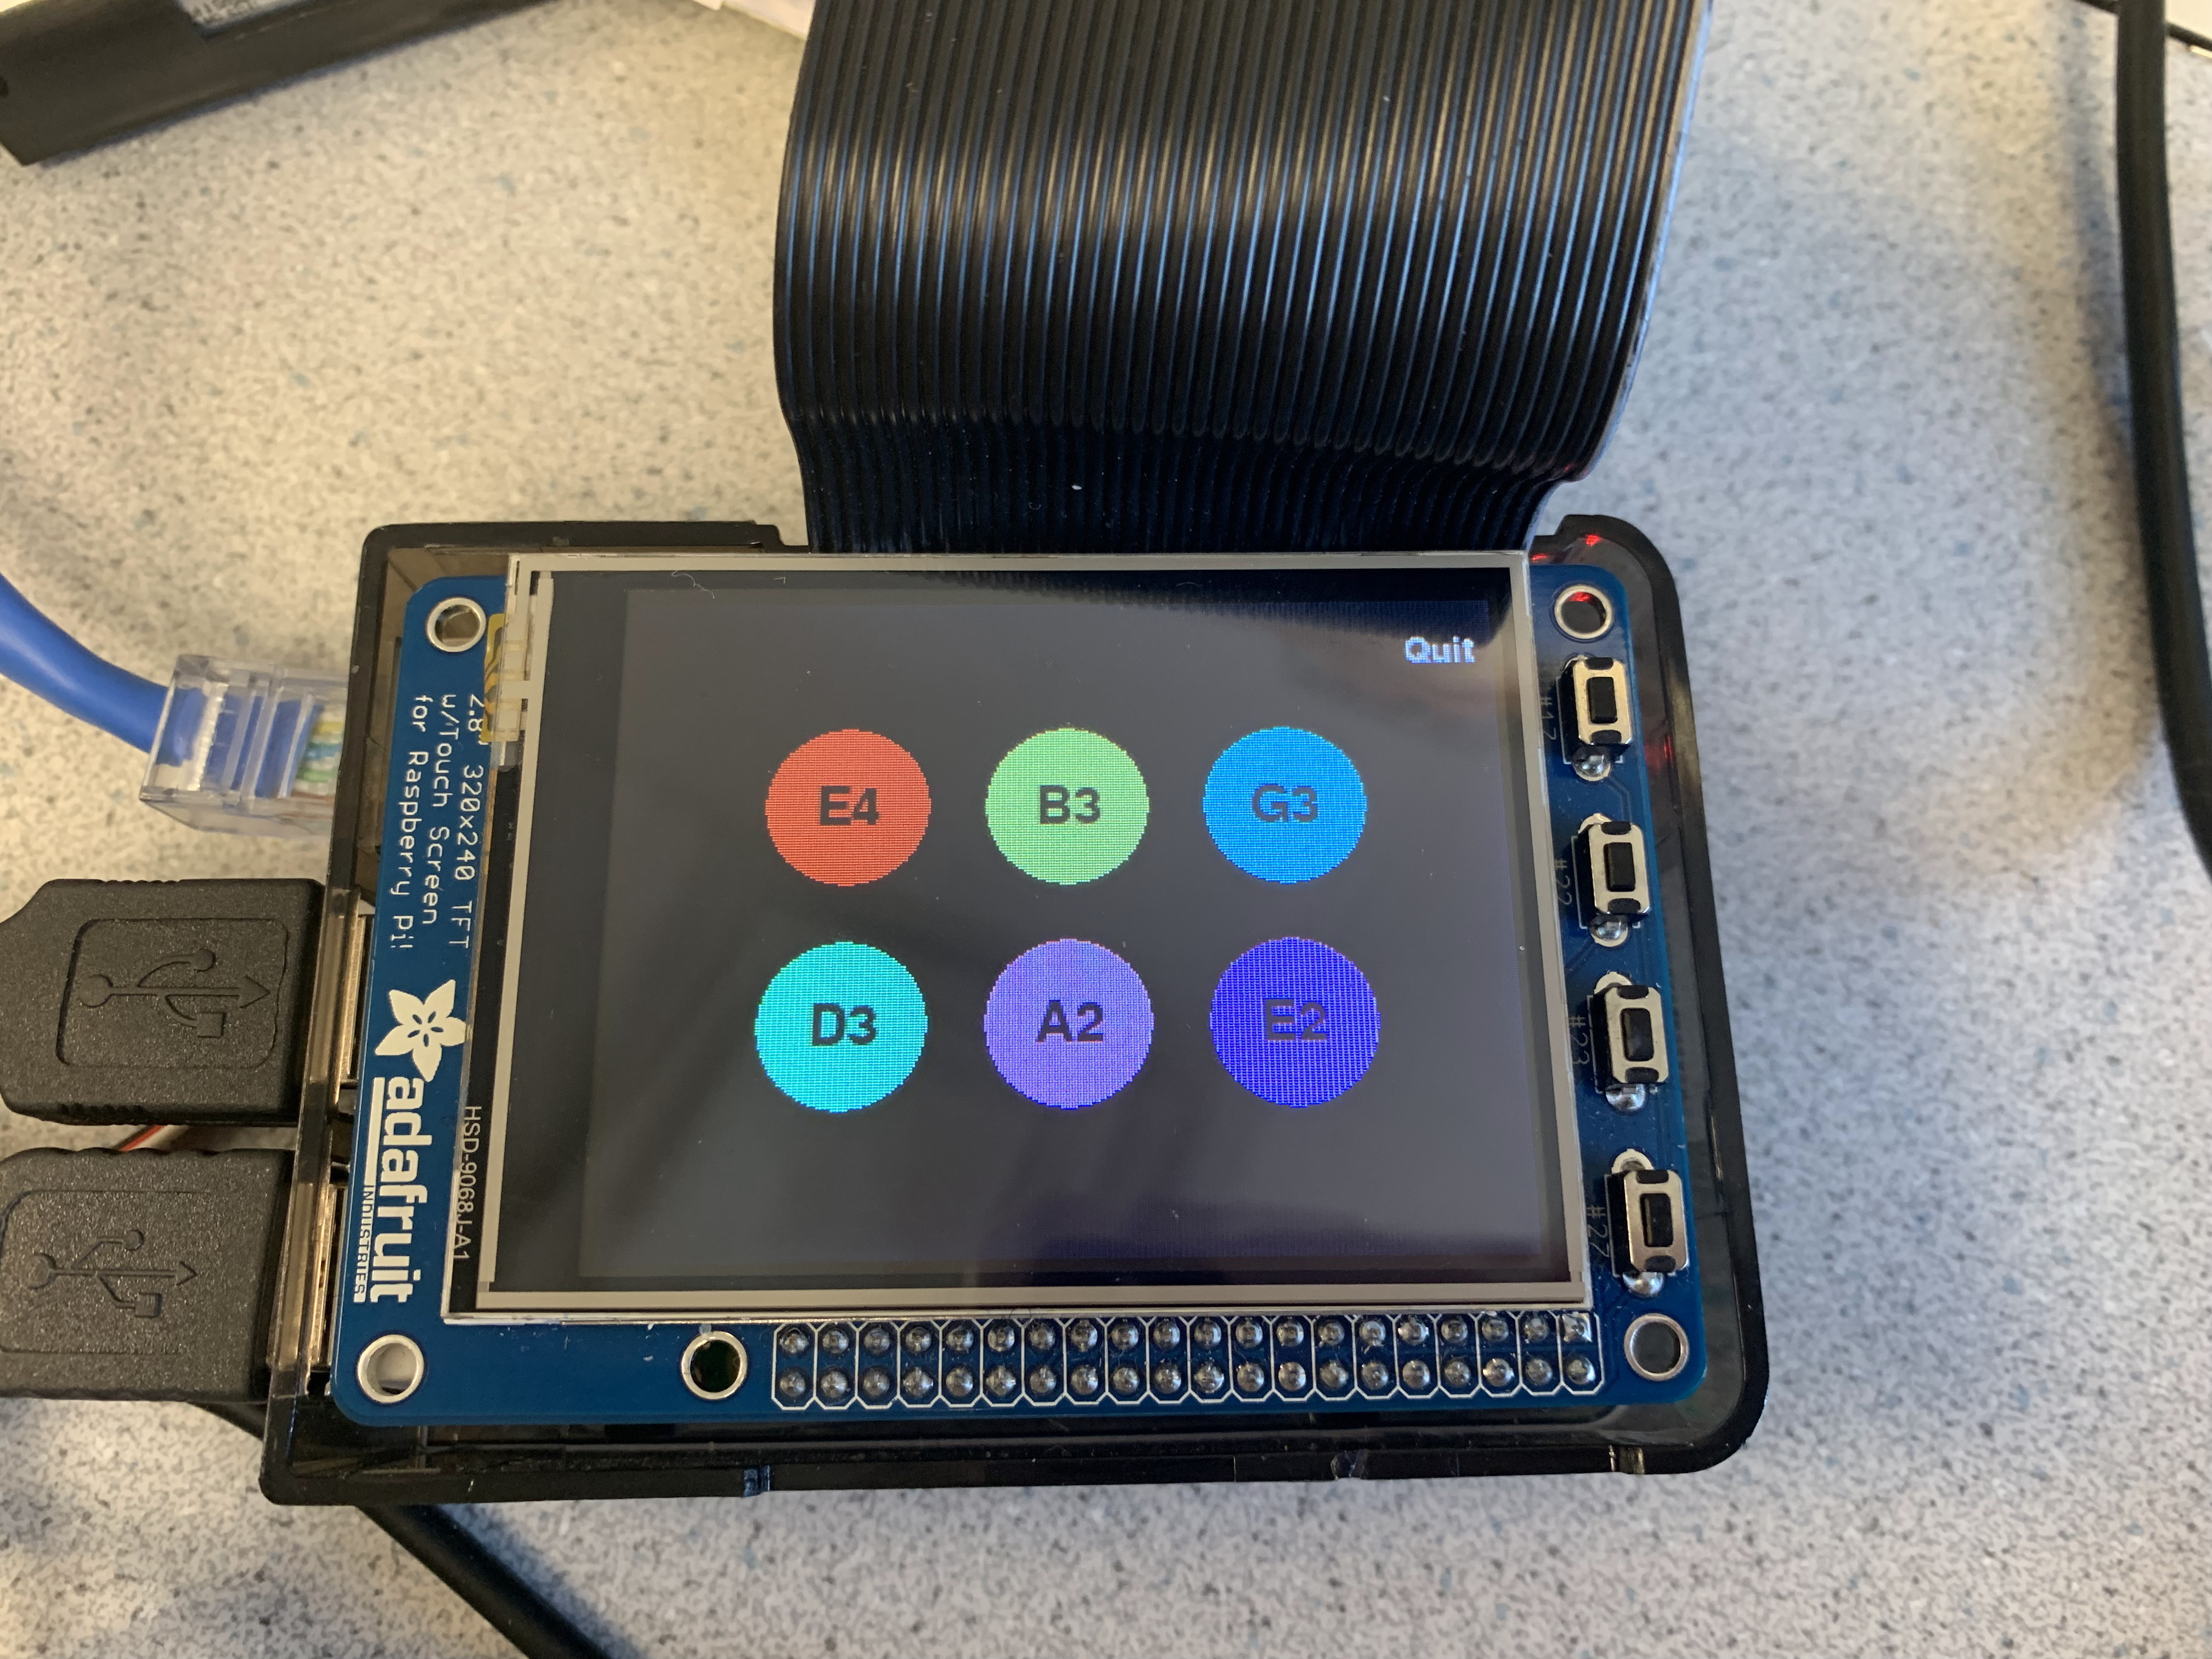
The second screen we called the “choice screen”. As the guitar has 6 different strings, on this screen, the user can select the string they want to tune by touching the appropriate circle for the desired string on the piTFT touchscreen. We display the scientific pitch notation for each string within each circle and chose to make each circle a different color for aesthetic purposes. This screen also features a button labeled “Quit”. Touching this button on the touchscreen would quit the Python script, and we additionally implemented a physical quit button connected to GPIO17 located to the side of the piTFT touchscreen.
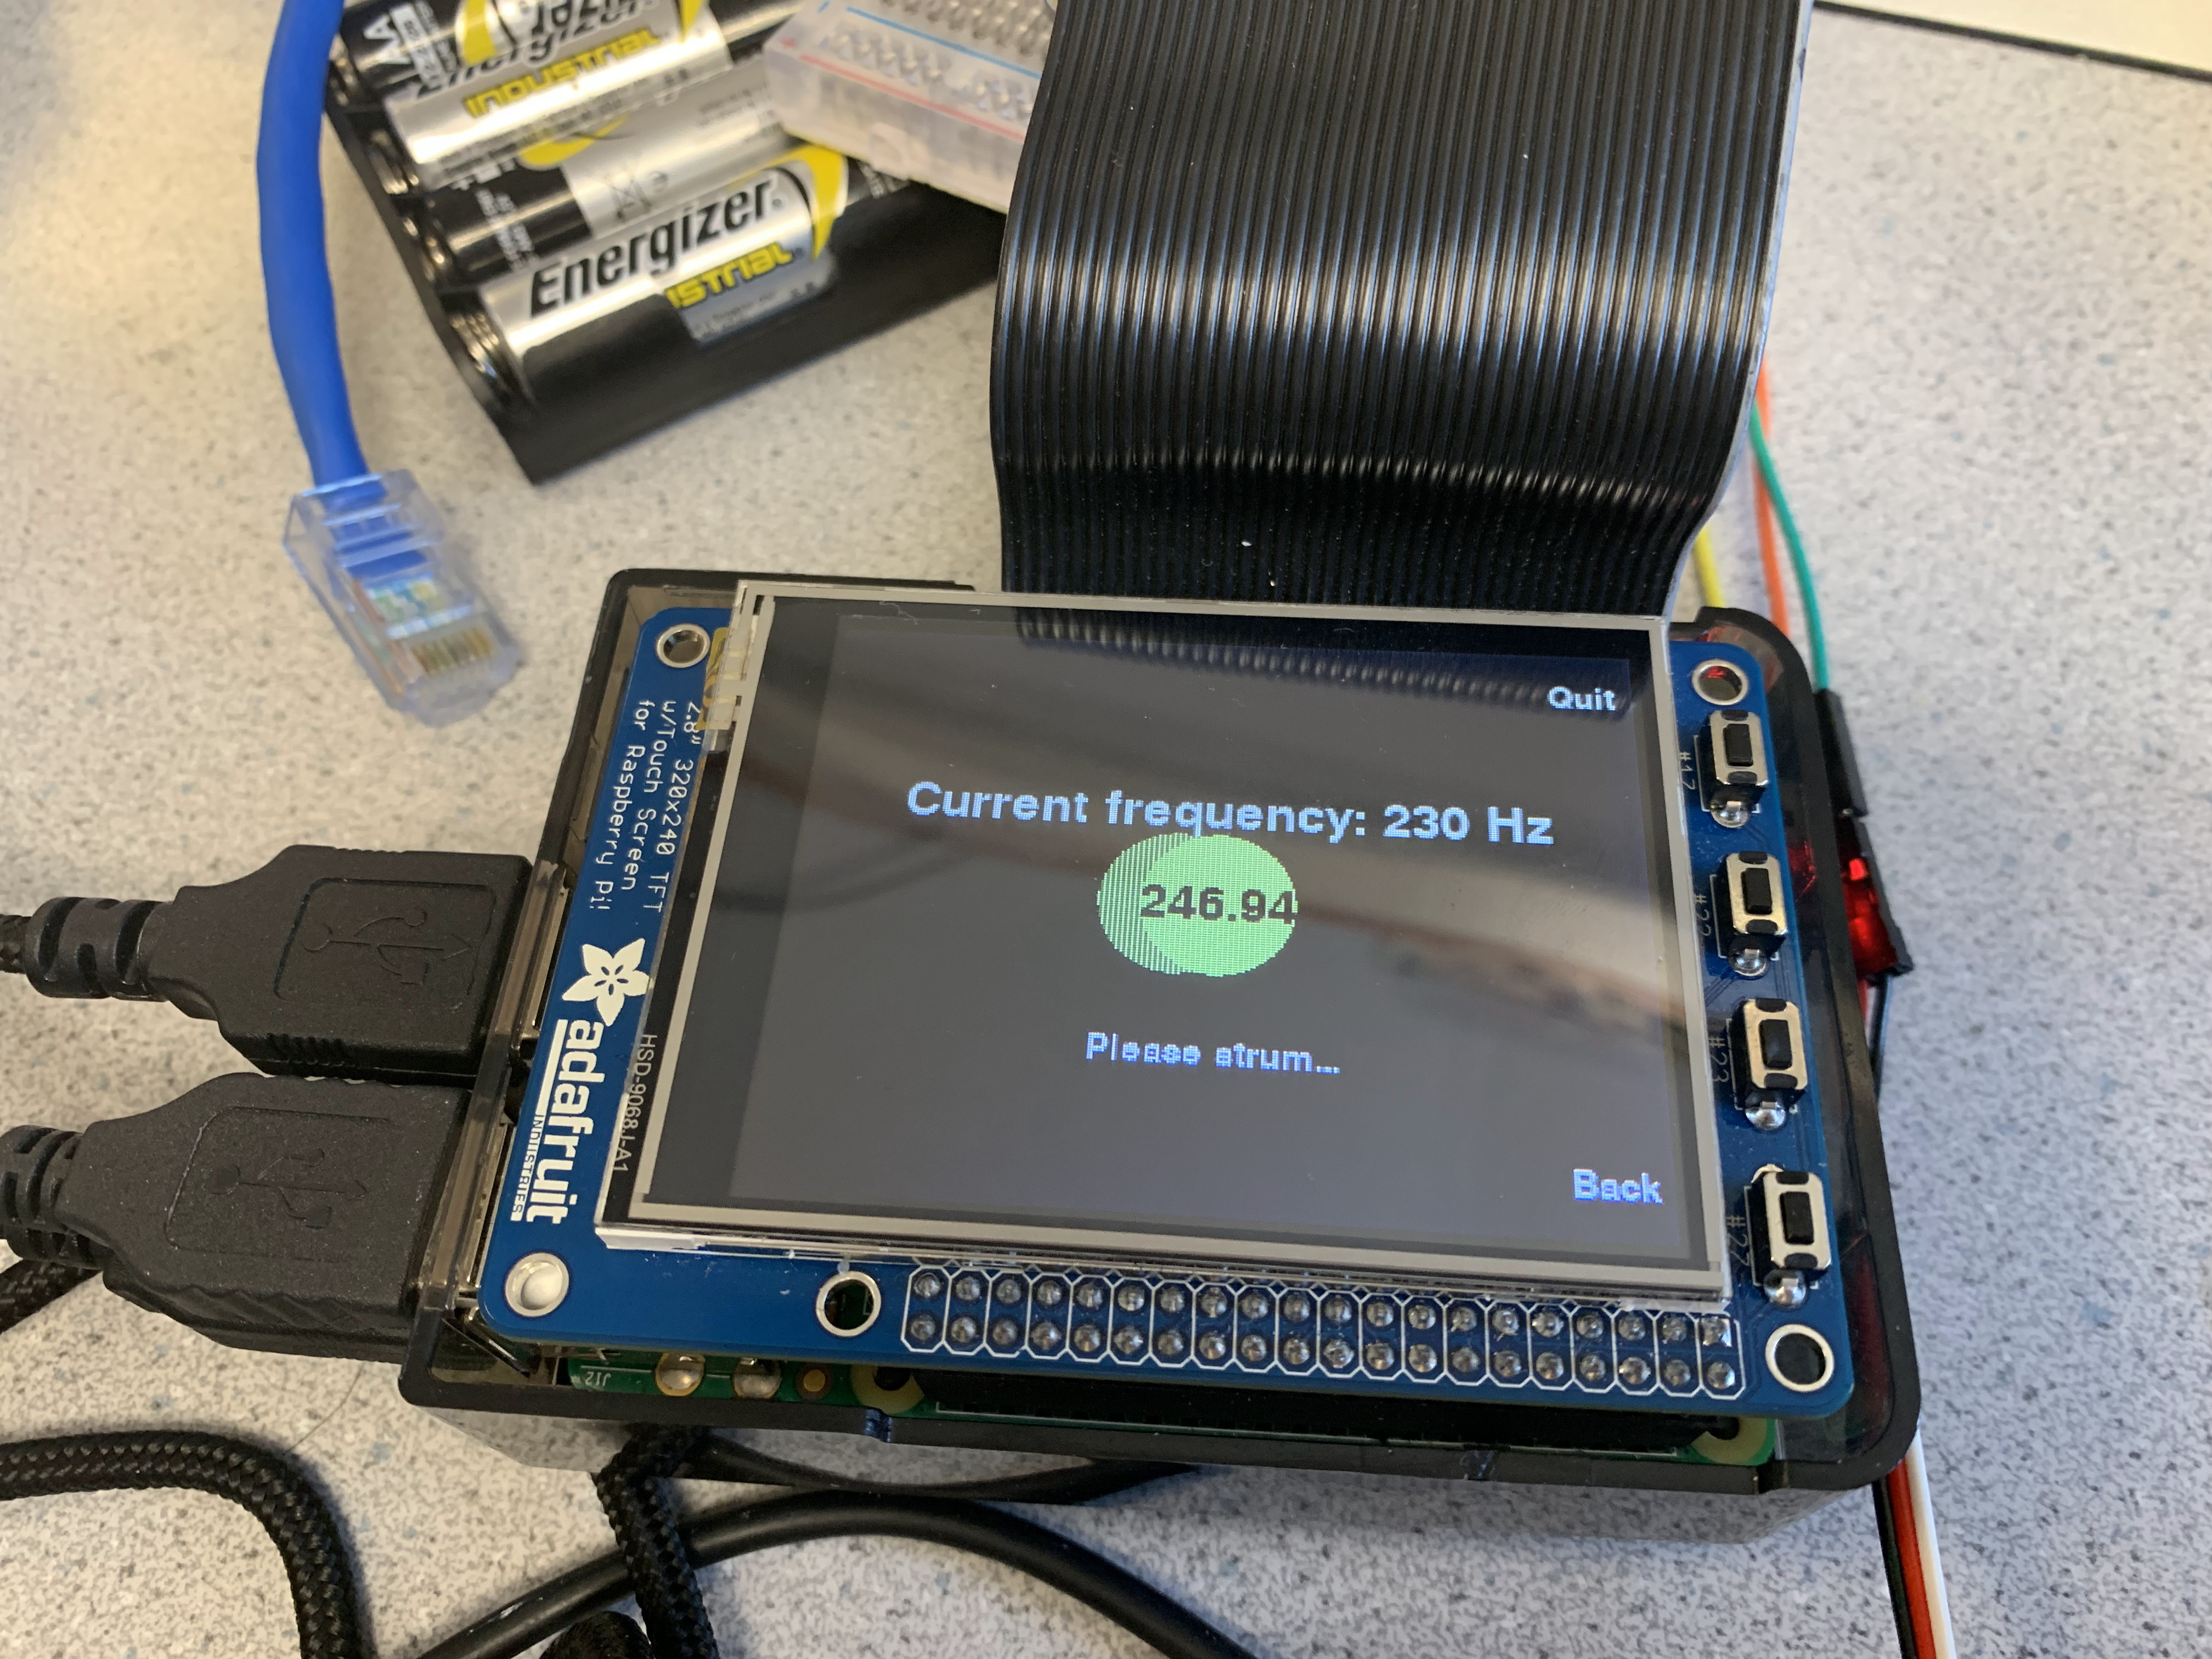
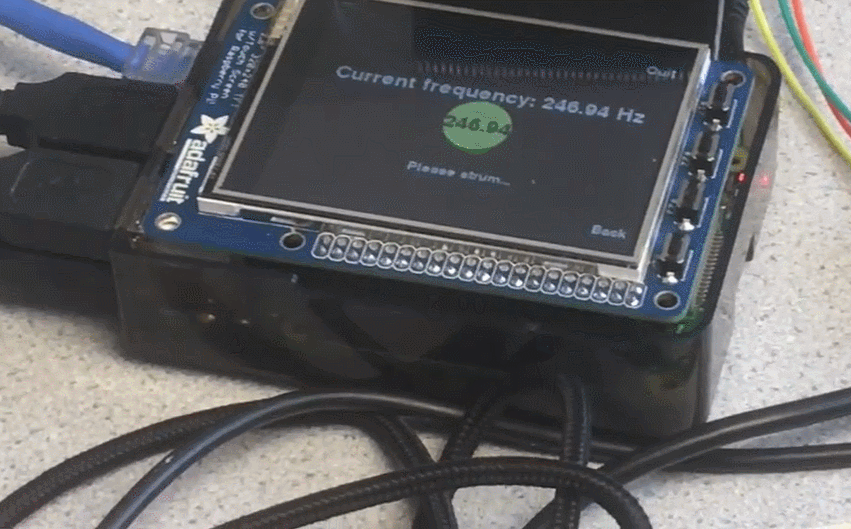
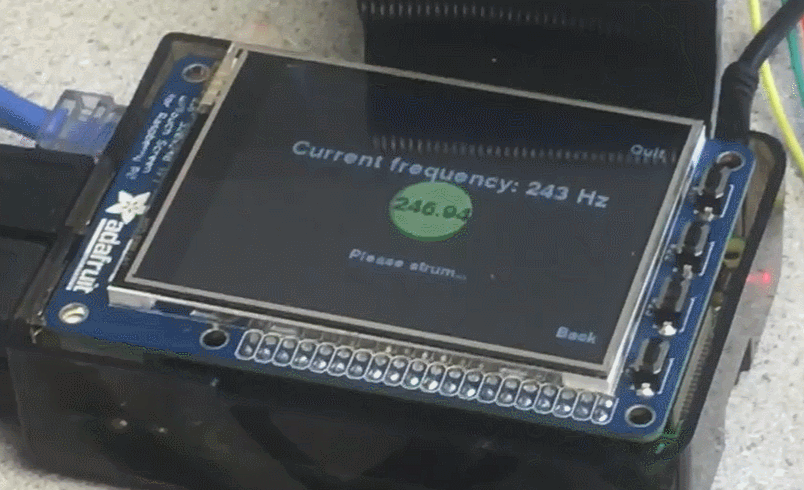
The final screens we call the “tuning-in-progress” interfaces. Once a string to tune is selected, the piTFT displays a screen which features a static colored circle drawn in the center of the screen which is labeled with the target frequency for that given string. A message below the circle reads “Please strum…”. On this screen, the frequency detection algorithm listens roughly every second to detect a new sound. The sound is only detected if its amplitude is larger than that of the average noise recorded at the start of the program. Another lighter-colored circle is drawn onto the screen every time a new sound is detected. The detected current frequency of the sound is displayed at the top of the screen. If the current frequency is less than that of the target, the lighter-colored circle is drawn to the left of the center circle, and if the current frequency is higher than of the target frequency, the lighter-colored circle is drawn to the right of the static circle. Since the algorithm listens for a new sound about every 1 second, the position of the current frequency circle is also updated every 1 second. The user is also periodically prompted to strum the string again every 1 second. Our algorithm allows for a tolerance of -2 Hz, so once the difference in frequencies is less than 2 Hz, the string is considered tuned. We chose to only consider current frequencies that are lower than of the target, so that we would be starting out with an initially loose string that would be tightened over the course of tuning. Once the string is tuned, a message is then displayed on the screen notifying the user that tuning is complete, and the interface returns back to the string selection screen. We also added a "Back" button, displayed in the bottom-right corner of the screen, to allow the user to return back to the string selection screen at any time, even if tuning has not yet completed.
For testing the user interface, we made sure that all the buttons on the screen - the string selection buttons, as well as the "Quit" and "Back" buttons - responded to a touch and performed the action they were programmed to do. Getting the string selection buttons and the "Back" button working did not give us any issues, but the "Quit" buttons were a bit tricky. For the "Quit" buttons, we defined a callback routine that upon touch of the on-screen button or push of the physical button, would change the values of two global boolean variables used as condition variables within the two while loops keeping the program running. For the operation of the "Back" button, we simply had to change the value of the boolean "tuning", which is the condition variable for the while loop that draws the "tuning-in-progress" screen, to False within our code if it was pressed in order to return to the string selection screen. To test the operation of the "Quit" buttons, we made sure that both the on-screen and physical buttons properly exited the program.
3. Tuning mechanism
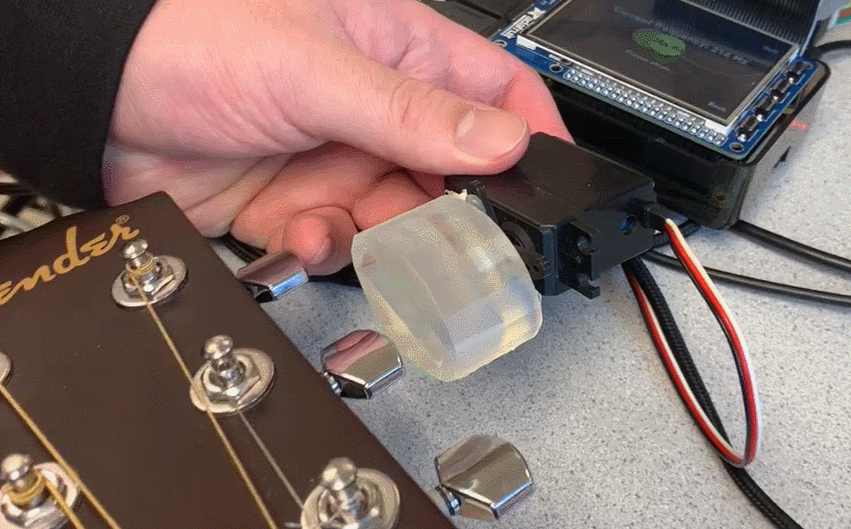
We designed a 3D-printed casing that fits over the tuning peg and is attached to a servo motor. If the current frequency difference in comparison to the target frequency is greater than 20 Hz, the servo motor would rotate at most half of a full rotation. Once the frequency difference reduced to less than 20 Hz, the amount the servo motor would rotate was proportionate to the frequency difference. The smaller the frequency difference, the smaller the servo motor rotation.
To test the operation of the servo motor, we would make small changes to how we would set the rotation of the servo motor, for example, how long it would rotate for and at what speed, and then observe its behavior following the changes. After doing a frequency-detection test as described above, we added in observing the movement of the servo motor as an additional check that frequency was being detected accurately. Only after we were able to verify the correct movement of the servo motor did we test out turning the guitar peg on our test guitar. This was done to ensure we would not accidentally break a string.